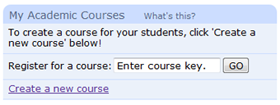
The Course Builder is accessed by clicking the “Create a new course” link on an instructor’s homepage. This link is located at the bottom of the My Courses section.
Course Builder Options
When you launch Course Builder, you will be asked to select one of four options. You can either create a new course, or if you have already created courses, you can copy a course, edit a course, or delete a course.
Select “Create a new course” when doing one of the following:
- Creating a new course for the first time
- Creating a new course section in a new semester
Note: Do NOT use “Create a new course from an existing one” across semesters. This literally copies the old course. Updates, new content, or bug fixes implemented since your old course was created will NOT be included in the copied course.
There are two modes of operation for creating a new course: Simple Mode and Advanced Mode.
Simple Mode condenses the process, giving you a default structure and schedule (or no schedule) and require you to make only a few decisions. Advanced Mode provides opportunities to customize content and schedules.
We will only describe the Advanced Mode here.
Mode Selection – Click the “Advanced Mode” radio button and then “Next.”
Selecting a Curriculum
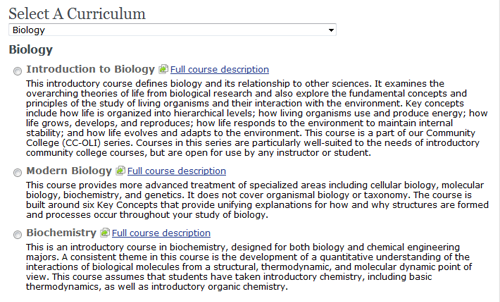
Select the subject area that you need from the “Select Content Area” pull-down menu. Each area of content will then present a list of curriculums available in that subject. Many content areas will have only one curriculum available.
Note: Brief descriptions are included and more lengthy descriptions are available by clicking the “Full course description” links.
Arranging Content
The Arrange Content screen is only available in Advanced Mode. It allows you to reorder or remove sections of the standard syllabus. It also provides a link to add content from other curricula or content areas.
Note: For more information on adding content from other curricula or content areas, see “Adding Content from other Curricula” under “Advanced Topics.”
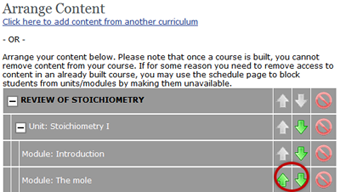
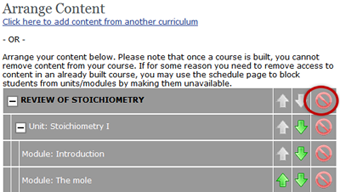
On the Arrange Content screen, you will see the list of all available units and modules in the course.
-
If you would like to accept the default, click the “Next” button.
-
If you would like to change the sequence of the material, click the up or down arrow next to the material you would like to move.
-
If you would like to remove content, click the remove button next to the module(s) or unit(s) you would like to remove.
Note: If you select items to delete, and then re-arrange any content, the deleted selections are reset. When you are finished arranging the sequence of the material, click the “Next” button at the bottom of the screen.
Creating a Schedule for Your Course Section
The Schedule Course screen allows you to set the dates of your course and manage how and when quizzes and other assignments are accessed by your students.
Note: Availability is different than “assigned/due.” Windows of availability define when the content is accessible to students. The date assigned and date due specify when students can start an assignment and by when they must complete the assignment. For example, assignments can be “available” to students after the due date to review their work—they just cannot change their answers.
STEP 1: START/END DATES & TIME ZONE
Enter the start and end date of your course. Select the time zone for your course from the Time Zone pull down menu (or “Other…” if your desired time zone is not listed).
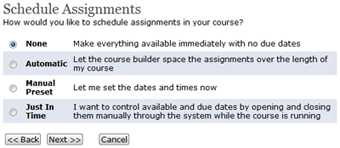
STEP 2: CHOOSE A SCHEDULE TYPE
This section of this page is only shown in Advanced Mode. It allows you to assign dates that quizzes, assignments, and content will be available and/or due.
Schedule Options
- None
- All Materials and assignments are available immediately and are never closed. This is the default. If you pick the “None” option, you will skip the rest of the schedule course screens.
- Automatic
-
The course builder uses information you provide to assign availability dates and due dates automatically, which appropriately span the duration of the course. It will only schedule “high stakes,” graded assignments.
Note: This is the first time we’ve used the term “high stakes.” All assignments are classified as either high or low stakes. Both types of assignments provide feedback to the student. Only assignments designated as “high stakes” will record student performance in the grade book. As an instructor, you will be able see student work on “high stakes” assignments, but not on “low stakes” activities. The terms “high stakes” and “graded” are often interchanged. Likewise, “low stakes” and “un-graded” interchange.
Note: You will be still be able to change any set date once your course has been built.
- Manual Preset
-
You will manually schedule each graded assignment.
With Manual Preset you can give the system information to use in creating a first pass at the schedule such as the days of the week you would like assignments to be due and any “block out” dates on which you do not want assignments to be due.
On the Schedule Course screen, click on a date/status next to any high stakes assignment to change the graded/not-graded status of the assignment or the available or due date. When you are finished setting the schedules, click the “Next” button at the bottom of the screen.
Note: You will not be able to change the status of an assignment from “un-graded” to “graded” once a course is built.
- Just in Time
- All assignments and course materials will be unavailable to students at the start of the course. You will manually release and/or close the assignments “just in time” during the run of the course. If you pick the “Just in Time” option, you will skip the schedule course screens.
Assessment Options
If your course has any “high stakes” assessments, you will have the opportunity to set many of the aspects of their administration. During your initial course build, you are able to make global changes. Once your course is built, you will be able to modify settings for individual assessments.
AVAILABLE OPTIONS
- Attempts
- Some assessments provide multiple attempts. This setting will allow you to limit the number of attempts for your students. The default will provide the maximum available attempts.
- Scoring Model
- If you allow multiple attempts, you can dictate how the system should handle scoring. You can accept only the highest or lowest score, you can average the attempts, or you can only accept the first or the last score.
- Password
- You have the ability to set a password for your exams. You can give students this password or, if you plan to proctor the exams, you have the option to give this password to a TA instead.
- Late Submit
- If your assessments are timed, this will determine how the system will handle an attempt to submit an assessment after the deadline.
- Late Start
- If your assessments are timed, this will determine how the system will handle an attempt to start an assessment after the deadline.
- Grace Period
- The amount of time (in minutes) that you will accept late work as if submitted after the deadline. Your Late Submit settings will not apply to any assessment submitted during the grace period. The grace period is not displayed to students.
- Time Limit
-
This setting will allow you to set a time limit for your exams. This time is specified in minutes.
Note: A timed test starts when the student hits the “start” link. If using a password, the password will unlock an attempt but it will not start the attempt, nor will it detract from the time allowed.
- Feedback Mode
- Determines what feedback the system will give each student and when that feedback will be displayed.
- Review Answers
- Sets whether or not a student will be able to review their answers before receiving feedback.
General Information
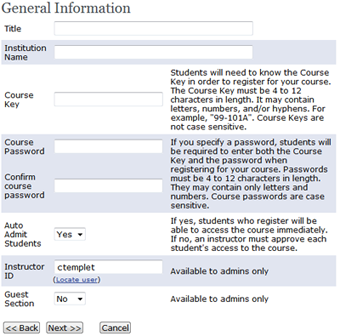
The General information screen is the place for you to:
- Name your Course
- Give your course a name that makes sense to both you and your students.
- Create a Course Key
- Choose a unique Course Key (each section must have a unique code). Your students will use this Course Key to register for the correct section. Give your students the Course Key when instructing them to register. The Course Key is not case sensitive, must be 4 to 12 characters in length, and may contain letters, numbers, and/or hyphens. For example, “99-101A.”
- Set A Password
- You may set a password for course access as well as an Course Key. This is strictly optional. If you choose to have one, enter and confirm your course password. Passwords are case sensitive, must be 4-12 characters in length and contain only letters and numbers. Be sure to keep the password secret and only distribute to students enrolled in your course.
- Set Your Admission Process
- Decide if students are admitted to the course as soon as they register or if you would rather approve each registration beforehand.
Confirm Course
The next page is a confirmation page. Review all of the settings for your course. If something is incorrect, use the links on the left hand side to go back to the appropriate step and make corrections. When you finish your review, click “Finish.”
Congratulations! The next page confirms your course was created and provides you a link to your Manage Course page.

