OLI Author
About
The OLI Author tool allows the user to build or edit simple Inline and Regular Assessments, minimizing or eliminating the need to manually manipulate the XML code.
It can accommodate Learn By Doing (LBD) and Did I Get This? (DIGT) inline assessments , as well as Checkpoint and Quiz regular assessments.
The tool is intended for use with simple assessments. Inclusion of introductory text or accompanying images cannot be accommodated using OLI Author. An assessment's XML code must be edited in these cases.
These features may be included in future updates.
System Requirements
Adobe Flash Player: Download from http://get.adobe.com/flashplayer/
Adobe Air runtime: Download from http://get.adobe.com/air/
Installation
To install OLI Author, simply click the "INSTALL NOW" graphic at the top of the page.
If you do not have Adobe Air installed, it will automatically downloaded for you.
- In the Application Install window that pops up, choose to Open the file.
- Click Install in the next window.
- Click Continue after verifying the installation location.
If you have problems installing, please ensure you meet the System Requirements and ensure you download the Flash Player and the Air runtime from the links in the System Requirements section.
Getting Started and How To Create a Simple Question
- With OLI Author open, click on the New Document icon, go to File > New, or type CTRL+N.
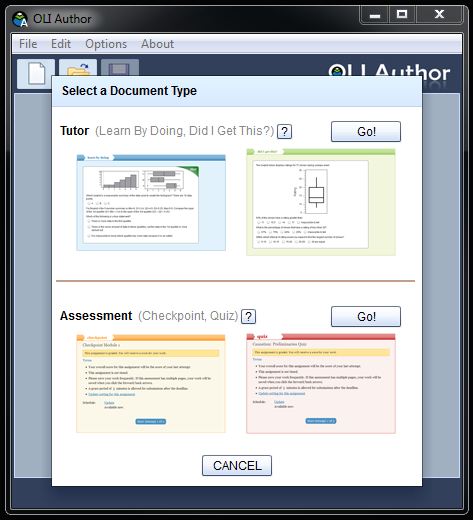
- Click the "Go!" button next to the document type you want to create: Tutor or Assessment.
- Learn By Doing tutor activities give students an interactive way to learn new material and receive guided practice without being graded.
- Did I Get This? tutor activities offer the opportunity for students to evaluate their understanding after a lesson. Again, this activity is not graded.
- Quiz and Checkpoint assessments usually fall at the end of a section or module, and are a way for instructors to assess students' mastery of the concepts. They report to the gradebook.
- Determine your Learning Objective, because it will help you decide which activity is best suited for your goal. Now is the easiest time to attach a Learning Objective,
when you are already thinking about your goal for the student. First, the Learning Objective helps you track student progress by linking each Learning Objective with the
measured results of the Tutor or Assessment. And second, mapping Learning Objectives allows course developers to monitor their design process -- how well do the practice/assessment
activities match up with the objectives? The field should be populated by the Learning Objective reference ID, not the text of the Learning Objective text itself.
- For this example Tutor was selected. Click on the Question Type drop-down box and click on a question type. Activities can have multiple question types.
- Multiple Choice: the student chooses from a list of possibilities.
- Short Answer: answers are to be given in sentence or paragraph form and graded by an instructor.
- Numeric: answer is given as a number.
- Text: expected answer is a word or simple phrase.
- Unknown Question Type: This is used for prototype questions that are not yet utilized by OLI courses or for experimenting with question types that aren’t fully supported.
If a document is opened by OLI Author and the question type is unknown, this is what will be selected for that specific question.
- Complete the displayed form fields accordingly:
- Question Prompt: This is the identifying question text that the user will read.
- Choices: A correct answer and all possible incorrect answers as choices to the question.
- Correct?: A radio button, when selected, determines that the corresponding choice is the correct answer. The student will be notified with a green feedback box displaying the Feedback text.
Any time a student makes a choice that is NOT identified as correct, a red box appears and displays the choice’s feedback text.
- Choice: This is the text the user reads as a possible answer.
- Feedback: This is the feedback text that displays after a user selects the corresponding choice.
- Hint: Text that will display if the user requests a hint. This should be guiding and informative in a way that will better help the user understand the question and determine the correct answer.
- Click on the Save Document Icon, go to File > Save, or click CTRL+S.
- A dialog box shows your computer's folders and files; navigate to the desired location.
- Save tutors to folders named x-oli-inline-assessment
- Save assessments to folders named x-oli-assessment2
- Use your development team's naming standards to name the activity, then enter the name in the File Name field and click the "Save" button.
Choose a name that will help you to locate and identify the file later. Your document has been created.
- Remember to SVN Add your new file and Commit it to the repository, or any reference to the activity will cause your course's XML to remain invalid.
Example Question Screenshot
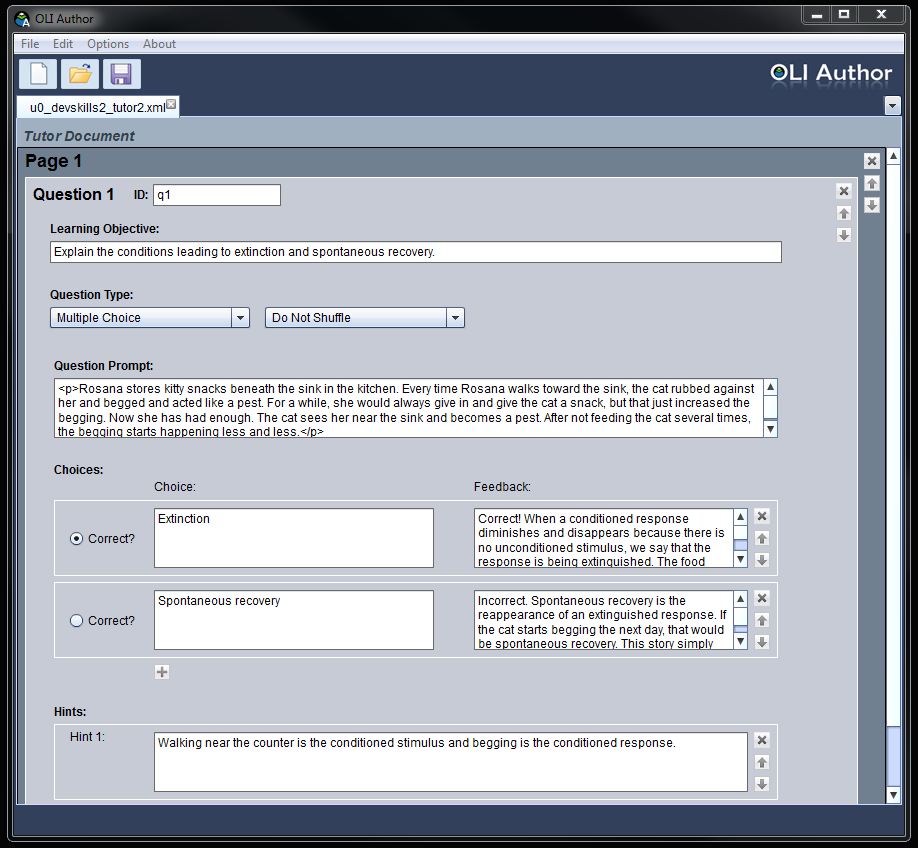
Here is a Multiple Choice Example.
- "Do Not Shuffle" has been selected to force the choices to be displayed in the order they are displayed in OLI Author. "Shuffle" is used if the choices you create should be shown in a random order.
- The question text resides in the Question Prompt field.
- Choices are placed in the Choice fields with the appropriate feedback in the Feedback field. Remember, the OLI platform strengthens understanding of the lesson's concepts by giving immediate feedback to the student. Your choices should target common student misconceptions with feedback explaining why each particular choice is correct or incorrect.
- Click the "plus" button below the last choice to add more choices.
- Hints are optional, but strongly suggested as a method of immediate guidance and reinforcement, again helping to strengthen the student's understanding and retention. The Hint text will display if an incorrect choice is made. Click the "plus" button below the last hint to add more hints.
- Click the "Add a Question" button to add a question. There is no limit to the length of the activity.
To Edit an Existing Assessment
- With OLI Author open, click on the Open Document icon, go to File > Open, or type CTRL+O.
- Edit the necessary fields, or add/delete questions and choices by clicking the appropriate buttons: Add a Question to expand your assessment, or the "X" button to remove an element (a choice or an entire question).
©2012 Open Learning Initiative